Step-by-Step Instructions on Using Your TapeBuddy®
Go To VideosQuick and effective drywall tape and joint compound application
- Choice of two controlled compound thicknesses
- Smooth even coat of compound applied to tape
- Uses industry standard paper or FibaFuse® tape.
- Applies more compound to the tape center
- Made of HDPE heavy duty plastic that will never rust
- Made to sit on a 5 gallon bucket
- Made in USA!
Preparation:
- Check all drywall sheets to make sure they are properly attached and that all the screws are below the surface.
- Make sure floors are free of all debris and clean.
- Gaps over 3/16” are best pre-filled with setting-type joint compound (mud) for less shrinkage.
- Suggested order for applying drywall tape: edge seams, butt joints then inside ceiling and wall corners.
- You’ll see how easy it is to Tape Like a Pro with your own TapeBuddy®.
Let's Get Started!
STEP 1
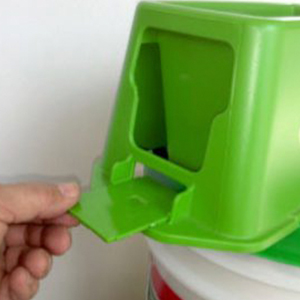
- Remove bridge insert from the front of the tool by clipping the tabs and a smooth any rough edges.
- Reversing this insert allows for 2 controlled mud thicknesses applied to the tape. Determine what mud thickness you need.
- Insert the bridge into the slides wording down, align and snap into place.
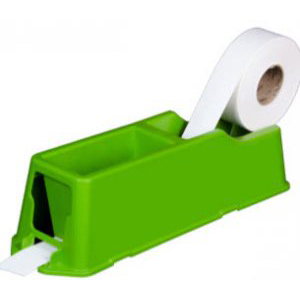
STEP 2
- Feed drywall tape from the tape holder compartment into the mud compartment center crease up and out through the mudded tape gate.
- You can use either 250’ or 500’ rolls of paper tape.
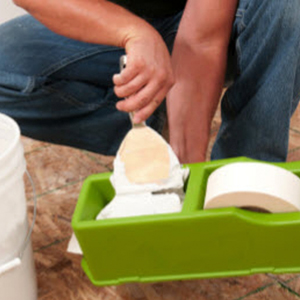
STEP 3
- Use “All Purpose Joint Compound” for applying paper drywall tape to joints.
- Premix All Purpose Compound by adding approximately one cup of water for each gallon of compound to form a creamy consistency. Mix well.
- With the drywall tape already passed through the mud compartment fill with mixed compound.
STEP 4
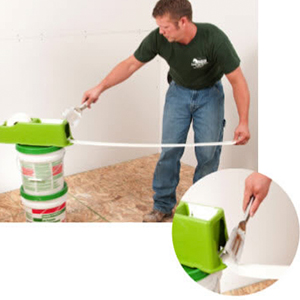
- With one hand on the machine, pull the tape straight out with the other hand to the desired length needed and hold upwards.
- Cut the mudded tape by inserting the drywall joint knife corner into the center of the tape about one inch from the end of the out-feed table.
- Make sure you leave enough tape for pulling the next piece.
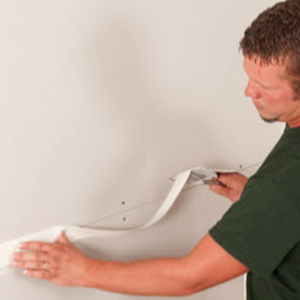
STEP 5
- Apply tape to joint with the mudded side towards the drywall.
- Use a 4 to 6-inch drywall knife to firmly embed the tape into the joint.
- Be careful to not squeeze out too much mud.
- Smooth the tape area and let it dry. Continue with top coats until finished.
- Clean-up tools with a brush and water then wipe dry.
Learn From an Expert
Myron Ferguson AKA “That Drywall Guy”® is a fourth-generation NYS Building Contractor, with 30 plus years as a drywall contractor. He is a member of the National Association of Homebuilders. Author of the bestselling book, Drywall; Professional Techniques for Great Results, (4th Edition), as well as a 1-hour companion video, Taunton Press. Book has sold over 400,000 copies. Has a DVD out; Drywall Repairs (2008). When he is not getting his hands dirty in his drywall contracting company he travels the country teaching drywall and related topics at trade shows, lumberyards, tech schools and construction companies. In 2009 Myron became certified in building envelope and building analyst from BPI. In 2010 became a green building verifier. In addition, Myron is a regular contributor to Fine Homebuilding, Journal of Light Construction, and Walls and Ceilings magazine.
Contact Us
Have more questions? We’ll be happy to answer them all. Have a look at the most frequently questions asked and if you feel that your question is not answered use the contact form to send us an email.